Thursday, April 29, 2010

Nunu's Kitchen - 15 min Chinese ginger & green onion chicken

Food I make!

I am on an Asian food kick, so sue me. The Pook and I both LOVE Chinese ginger and green onion chicken, also known as "White Cut Chicken". It's essentially a chicken poached in a special broth and served with a sauce made out of chopped ginger and green onion. In my own version of the recipe, instead of poaching the chicken, I steam it, it's a big short cut - no need to make the poaching broth and no need to switch off the heat at a precise moment so as not to over cook the chicken - but without sacrificing on taste.
Traditionally, this dish is done with a whole chicken, but because there is only two of us at home, I just did it with drumstick (actually the truth is I have no idea how to chop up a whole chicken xD).

Ginger and Green Onion Chicken

You will need: 
  • 8 medium chicken drumsticks;
  • Approx 2 finger width and length piece of ginger - chopped finely;
  • 4 small stalks green onion - chopped finely;
  • 1/2 tsp salt;
  • 2 tbsp light soy sauce;
  • 1 tbsp vegetable oil;
  • Optional - 1 drop sesame oil;
  • Optional - for extra flavour, a pinch of chicken powder.
La Methode:
  • Clean and pat dry the drumsticks, steam them using your preferred method of steaming - I used a steamer but you can use your wok if you want. For 8 medium drumsticks, 10 minutes from boil should be sufficient. If you're unsure, poke the chicken with a chopstick and if it goes through cleaning, it is cooked through.
  • While the chicken is steaming, mix together the ginger, green onion and salt. Taste. It should be pretty salty.
  • In a pan, heat up the vegetable oil until smoking, carefully pour over the ginger and green onion mix. It should sizzle.
  • Add soy sauce and optional sesame oil and chicken powder.
  • Serve steamed chicken either with dipping sauce on the side or drizzled over it.

Tuesday, April 27, 2010

Nunu's Kitchen - Pan fried sole fillet

Food I make!

Pan Fried Sole Fillet

You will need:

  • 2 sole fillets - washed and patted dry;
  • 3/4 cup beer of your choice - I used a pale ale;
  • 1 egg;
  • 1 cup bread crumbs;
  • Salt & Pepper to taste;
  • 1 tsp lemon juice;
  • 1 small bunch basil - chopped finely;
  • 1 clove garlic - minced finely;
  • 1/4 cup mayonnaise;

La methode:
  • Salt and pepper both sides of sole fillet;
  • Mix together beer and egg;
  • Marinate sole fillets in beer mixture, try allow them to sit in there for at least 20 minutes or so;
  • In the meantime, make your sauce by mixing together the mayonnaise, lemon juice, basil and minced garlic. If it tastes too sour, add more mayonnaise. If it tastes too garlicky, add more basil. There's no set formula to these things, your own taste buds are the best tools in the kitchen!
  • Pour breadcrumbs onto another plate;
  • Coat the fillets by dipping them into the plate of breadcrumbs, use your hands to pack the breadcrumbs onto the fillets;
  • Oil a non-stick pan with a mixture of half butter and half olive oil, once oil is hot, turn heat to medium and place fillets into middle of the pan;
  • Flip the fillets once, when you can poke all the way through the fillet, they're cooked. Depending on the thickness of your fillets, I would say about 2-3 minutes for each side is enough;
  • Drain on a paper towel. Serve with rice and veggies.

You guys don't know how ecstatic I get when I get comments from my readers telling me that they've tried my recipes and like them!!! Do let me know how yours turn out should you decide to try make any of the Nunu's Kitchen recipes! Tell me what works, and what doesn't. I'm always on the lookout to improve!

In other news, guess who came to play?xD


and guess where we went?!


Full post coming soon! xD

Monday, April 26, 2010

Silk Whitia Finest Pearl Powder Moisturising mask review

Continuing my review on the Silk Whitia Finest Pearl Powder mask line. Once again as a point of generality, I apply these masks after washing and drying my face as usual, I keep them on for approx 20 mins, and then I rinse my face according to the directions.

What they say (for the moisturising mask):
"Also contains Hyaluronic Acid and hydrated pearl finest powder which quickly penetrate into the deep skin to improve dry condition. Locks moisture and energizes the skin."

What I say:
No more and no less moisturising compared to the other two varieties in the line. It's pretty hard to determine exactly how moisturising a mask is when it has to be rinsed off. Personally I would prefer a moisturising mask where my skin is allowed to absorb the remaining essence. If I have to rinse off the remaining essence I feel like I'm "wasting" something which my skin could've benefited from had it been allowed to absorb it. I know some girls dislike the feeling left behind by sheet masks and rinse off regardless, so it's just me.
I would say the most noticeable differences were that the fine lines under my eyes were plumped up and no longer visible, and my skin tone afterwards was much brighter overall. My skin was also baby bum smooth.
The essence is thick and has a bit of a tightening feel when it dries, kinda like an egg white mask.

Before photo:

After photo:

Damage: C$25-C$15 for a pack of 5. Often goes on 2 for 1 special at Sasa. Probably considerably cheaper in Asia.

Verdict: I would say the effects of this mask is on par with MBD masks, so if you find it too difficult to get your hand on these masks, just go the MBD route.

p.s: Feeling a bit under the weather today so this post might contain more punctuation and grammatical mistakes than usual.

Thursday, April 22, 2010

Nunu's Kitchen - Lemon & Herb Hailibut

Food I make!
Lemon & Herb Baked Halibut


You will need:

  • 550g Halibut steak - washed and dried
  • 1/2 cup white wine of your choice;
  • 1 small bunch coriander - chopped finely;
  • 1/2 tsp fennel seeds;
  • 1 heaped tbsp crushed garlic;
  • 1 1/2 tbsp olive oil;
  • Salt & Pepper to taste;
  • Paprika;
  • 2 tbsp lemon juice;
  • Butter;
  • Seasoned breadcrumbs;

La methode:
  • Butter a shallow baking pan;
  • Salt, pepper and paprika both sides of the Halibut steak, and allow it to marinate for at least 1 hour;
  • Mix together the white wine, garlic, olive oil, chopped coriander and fennel seeds, set aside;
  • Pre-heat oven for 375 F on "Broil";
  • Pour wine marinade over fish, cover with foil and bake in oven for 10-15mins or until fish flakes easily when poked with a fork;

  • Remove fish from oven, sprinkle with breadcrumbs and bits of butter;
  • Turn oven temperature to 420 F;
  • Return fish, uncovered, to oven for a minute or so to melt the butter and to brown the breadcrumbs;
  • Serve accompanied with the wine marinade remaining in the pan and starch of your choice.


Wednesday, April 21, 2010

Silk Whitia Pearl Finest Powder Pore Refining mask review

Once upon a time, in a land close to the North Pole, a Somalian pirate received a gift in the mail from her friend in Singapore (no she's much prettier than Chow Yun Fat). The gift made the Somalian pirate giddy with excitement because they were the much talked about Silk Whitia masks that she'd been hearing all about but could not get her hooks on as they were nowhere to be found in Vancouver town.

Allow me to tell you a funny story which might bring people with questionable keyword searches to my blog. The first time I used these masks, I wasn't aware of exactly how MUCH essence was inside the packet, so I just opened it anyhow. So there I was, lying down in bed, trusty Robert Jordon by my side, I ripped down the allocated edge...and....Girls, there's no other words I can use, but I was bukkaked (PLEASE do not Google this term unless you're over the age of 25, no I mean it!) on by a face mask. It just...exploded in my hands, landed all over me and I was left looking like the female lead of a certain Japanese film genre.

....

Ok, onwards! I believe the Pearl Finest Powder line comes in 3 varieties; whitening, moisturising and pore refining. My friend (Hiiiiiii Dreezy!!!!I'm sorry, I'm a terrible friend, I still haven't finished your pack T.T) thoughtfully sent me a couple of each variety so I'll be able to give my opinions on all 3 xD. As a  point of commonality, I apply these masks after cleansing and drying my face, I keep them on for 20-30mins, after which it is removed, I then rinse my face and apply night cream as usual. These, like my beloved MBDs, come individually packaged and have adjustment notches. The fabric is thin and clings to skin really well.


What they say: (Pearl Finest Powder series in general)

"The Pearl Finest Powder contains collagen to repair damaged skin and relieve fatigue. Restores vitality and effectively nurses the skin. Eliminated treat from external environment on skin leaving it healthy and natural." 


Pore Refining:

"The Botanical Astringent Essence contained refines pores and cures acne and blackhead. The Pearl Finest Powder revitalizes the skin leaving it smooth, fine and radiant." 

Before photos: (close ups on my pores and blackheads ahead, cover your eyes girls)


After Photo:
Face was brighter and skin was much smoother and softer after use.


Soy outbreak still very much visible T.T


Damage:  C$25-C$15 for a pack of 5. Often goes on 2 for 1 special at Sasa. Probably considerably cheaper in Asia.

Verdict: 
After the whitening mask I had high hopes for this one. Unfortunately this one wasn't able to stand up to the moon craters I have for pores (oh pore me). If I have to give them the benefit of doubt then I'd say it shrank my pores infinitesimally but nothing visible on a grander scale. I had no active acne when I tried this mask so I can't speak to that property, however, as you can see, my blackheads are very much uncured.
Despite this, my skin was left very soft and smooth, and it was pretty radiant.


Dislikes: Inconvenient both because you have to rinse after use and because it's hard to get outside of Asia. Application can get messy because the essence is pretty thick, almost like albumen just slightly more liquidy. Also the price might be a bit high for some?

Tip: If you intend to purchase these masks, see if you can grab some mask tablets while you're at it. They're basically dry masks that have been compressed into a tablet form. They'll soak up whatever liquid is it that you put them into, may it be toner, lotion or serum, and they'll unfold themselves in the process. These Silk Whitia masks truly do contain enough essence for two masks and since they're pretty hard to obtain outside of Asia, I'm ghetto enough to save the extra essence that's in the bag, stick it in the fridge, and use it the next day with one of my mask tablets.


Tuesday, April 20, 2010

OCC Lip Tar review


Getting around to reviewing some of my IMATS haul. When I asked around for suggestions on what to buy at the IMATS, everyone recommended OCC's Lip Tars. After seeing Temptalia's swatches and how she mixed together different colours to create custom shades, I wrote down about half a dozen different shades in my "To Buy" list. In the end, I only got one...not for lack of wanting more but rather because I talked some sense into myself: the likelihood of me mixing my own lip colour = Nil
So instead of getting blue and green and black, I ended up getting up a single colour which I would wear on its own.

What they say:

"A stunning new innovation in lip color, OCC Lip Tar combines the longevity of a lipstick, with the ease of application of a gloss. Goes on slick and moist, and dries down to a satin finish. Ultra-saturated in color, OCC Lip Tar contains an unprecedented amount of pigment, so a little goes a very, very long way. An intense yet featherweight layer of color that stands up to the scrutiny of Hi-Def Video and Digital Photography, without ever looking (or feeling!) heavy. Meant to be mixed, OCC Lip Tars come in concise range of colors (and black and white!) for a limitless selection of shades made by you!
Like all of our products, OCC Lip Tar is 100% Vegan and Cruelty-Free, and is also free of parabens and other harsh preservatives. A simple, elegant formula that contains Hemp Oil, Peppermint Oil and Vitamin E, OCC Lip Tar feels as good on the lips as it looks!"
Ingredients: Ricinus Communis (Castor) Seed Oil, Cannabis Sativa (Hemp) Oil, Mentha X Peprita (Peppermint) Oil, Tocopherol Acetate (Vitamin E)
May Contain: D&C Red #7, D&C Red #30, FD&C Blue #1, FD&C Yellow #6, Iron Oxides, Titanium Dioxide

What I say: 

The OCC website describes Hush as "Antique ballerina pink", I would say it's a pale nude pink in the same colour family as MAC's Hue and Myth.
Level of opacity can be built up depending on your preference, I prefer a more sheered out, topped with gloss look but if you're a fan of the opaque pale lipped look, this will answer your prayers.

Although it may look like it's meant to be applied directly from the tube, DO NOT DO SO! as lazy as I am, I had to resort to using a lipbrush (I didn't know I had one but yeah I found one in my stash and it was Dior @.@ Sweet!). The Lip Tar applies glossy, and dries down to a matte-ish, satin finish which some might find a bit drying. The formula feels light and "clings" to lips really well, a bit too well actually, especially to all my lip lines T.T  - wear lipbalm underneath! Words of warning: less is more. You only need a tiny bit to cover your lips, anything more and it tends to go everywhere. I would think a lip pencil would definitely help as it's a tad tricky to apply.
The only thing I dislike about this is its peppermint smell/flavour. It makes me think that there's toothpaste on my lips that I haven't wiped off yet, ugh I hate peppermint, it's second only to my hatred of anything Patchouli.
As to its longevity, as long as I let it dry properly before applying my gloss, it'll stay from the time I apply it in the morning to midday, so I'd say average about 4 hours of wear.
If you're lazy like me, and not likely to mix your own colours, in addition to Hush, Pageant (Fuchsia), Grandma (gorgeous gorgeous coral, why did I not get it?!), NSFW (OMFG red), Anime (Neon pink), and their coming soon colour Memento (Beige pink) are colours that can be worn alone.

Damage: $12 on OCC's website, I got it for C$10 at the IMATS.
Verdict: If you like liquid lipsticks, this one is for you!

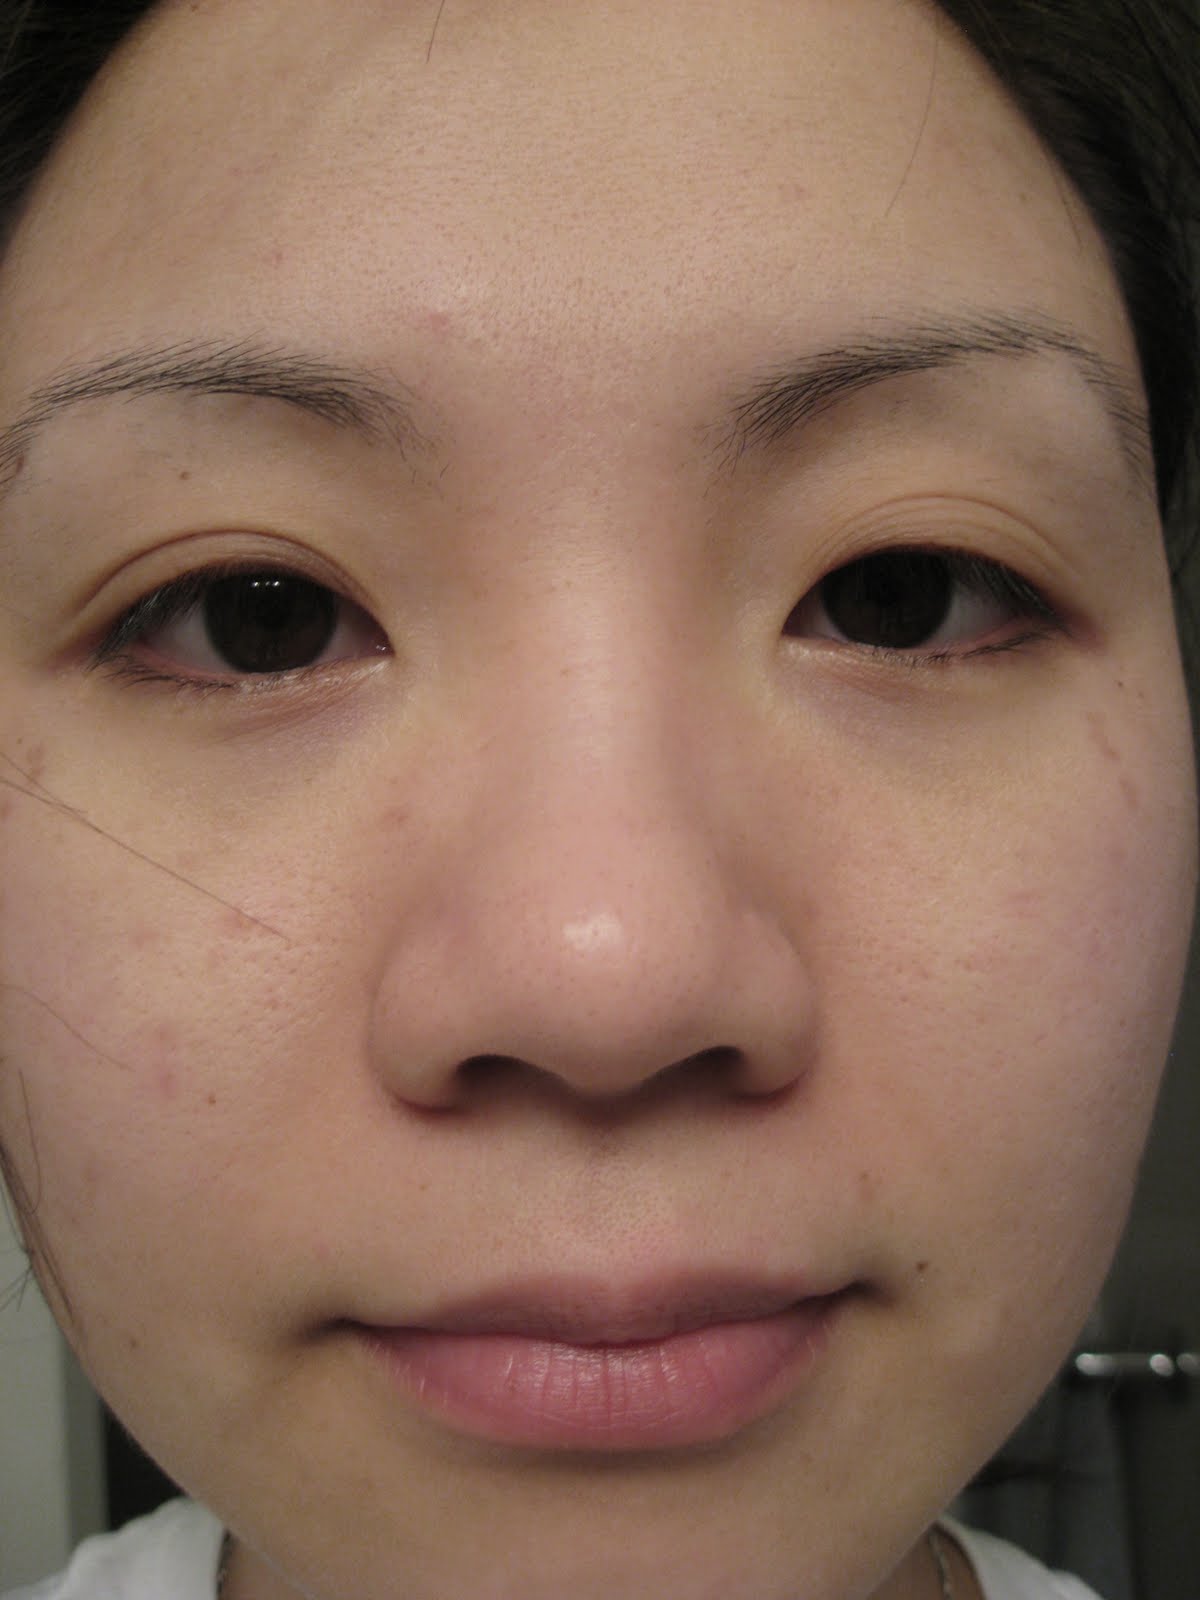
Hello lip hair, I've missed you so, nose hair says hi! My naked lips.

Hush alone.

Hush + MAC Underage gloss

Swatched on NC15-20 skin

Sunday, April 18, 2010

IMATS Vancouver 2010 Part 3 (final)

Continued from Part 2

I couldn't resist the pull of the MUFE HD Blushes so I headed back to the MUFE booth.

She's all done! Absolutely amazing!


The artist and his work along with Mr. Bennett. I absolutely HAD TO sneak a photo of this!!

They posed for me!!!! They saw me taking photos and they just posed for me!!!! They look so adorable xD haha Kevin kept going on about how he's so glad he wore HD foundation that day and he was telling me to take the photo from a higher angle cos that's when he looks his best LOL!

Then he called me over and.....*Nunu died at this point and can no longer comment*

MAC seminar with MAC Pro senior artist Caitlin Callahan. She demonstrated the looks for Spring/Summer 2010. She also talked about her kit, interesting to learn that she never carries around lipstick, "takes up too much space", or lipgloss, "only a tube of clear gloss, as long as you have the primary colours you can mix up anything" and carries 2 tubes of concealer in place of any foundation, " foundation bottles take up way too much space and between these two (a light and a dark) concealers, I can pretty much match any skin tone. Foundation and concealer are pretty much the same thing, just one is more concentrated". For inspiration, she looks to art books (her background is in painting) and the makeup scene in England as she finds their work very ground breaking and unlike anything in North America. She also gave tips on how to do the perfect cat eye, "divide it into 3 parts. Firstly, a half inch long line from middle of eye to end of eye. Secondly, draw another half inch line from the inner corner of the eye to join with the line from the middle of the eye. Lastly, to do the wing, simply draw a line extending from the lower lash line upwards."


She's extremely animated, I don't have a single non-blurry photo of her -__-

Close up.


I loved her Louboutin booties!!!

Waiting for the students' competition prize giving. Apologies for the poor photo quality, the lighting was low and my camera was running out of juice.


This one really channeled Johnny Depp's Mad Hatter!


This one was my favourite!!!

My favourite one won!! Kenji Sato of Toronto was the winning artist.


Eerie and beautiful at the same time!


2nd place winner.


3rd place winner from Vancouver!


This model was so nice, she obligingly turned to face the window for me to take a photo xD


and finally, my haul:

All in all, it was an amazing experience. I saw lots, learnt lots, and met lots of amazing artists, including several long time idols of mine. The only negatives in my opinion is that there weren't many exhibitors compared to some of the other IMATS shows, and the exhibitors that did attend did not carry their full line of products. Several of the booths had reps that I felt did not really know much about the products and were only hired to man the booth. I didn't buy much, I'd anticipated doing a lot more damage but I'm pretty happy with my haul. Full reviews of everything coming soon!
Thanks for reading!

Part 1
Part 2