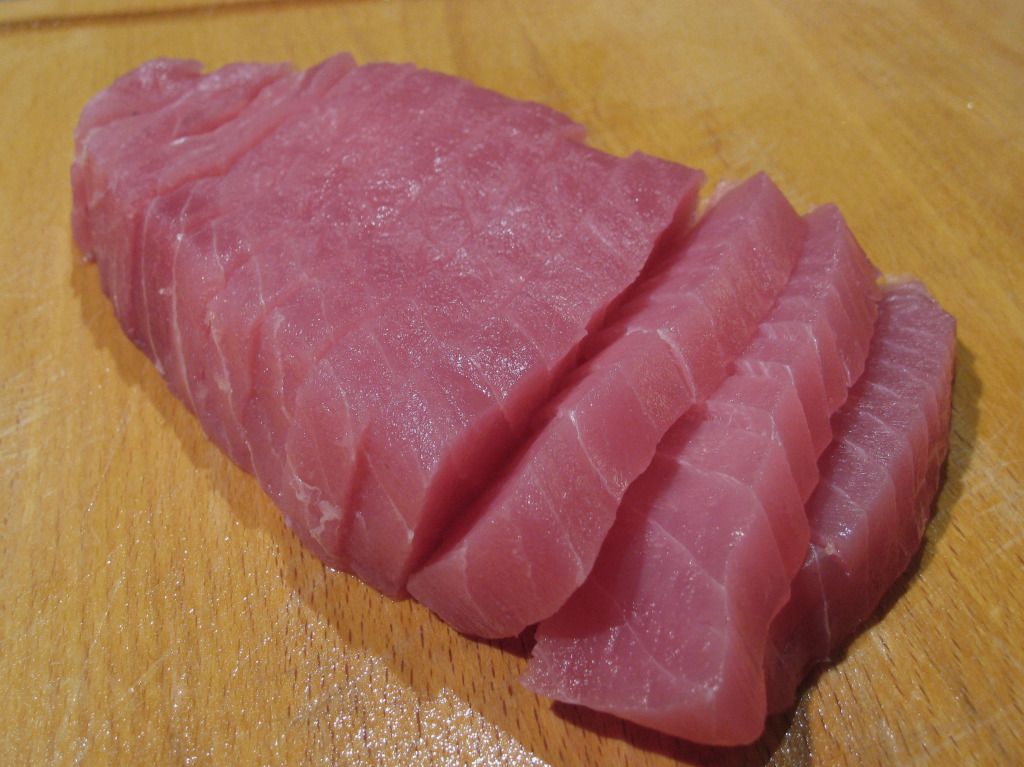
Feeling nostalgic for the delicious poke we had from Da Poke Shack in Hawaii, I attempted to recreate the dish back home in Vancouver. I must say it was rather successful *humble brag*. Poke is basically cubed tuna sashimi marinated in soy sauce, however, you can add various other condiments to your taste.
Ingredients: 250 g Ahi tuna steak (make sure it is sashimi grade!!!) - cubed
2 stalks green onion - diced
1 medium avocado - cubed
1/4 medium onion - diced
lime juice - to taste
sashimi soy sauce - to taste
sesame oil - to taste
nori and sesame furikake - to taste
Shichimi - to taste
Method:
Mix together avocado, onion, green onion, lime juice, furikake and shichimi;
Because it's really THAT good!!
This makes about 4 servings (or 1 1/2 if you live in my household -______-")
Ingredients:
4 things of Udon - I like the frozen ones, they have better texture and taste.
About 200g of fresh mentaiko (Japanese marinated pollock roe). Use more or less depending on your love of mentaiko. We like LOTS of it xD
Kimchi - amount also depending on your love of kimchi.
1/2 tbsp garlic butter/regular butter, melted
1 tbsp cream
1 tbsp mayonnaise. You should probably use Japanese mayonnaise like Kewpie but I just used Hellman's 1/2 The Fat Mayonnaise because that was all I had xD.
1 tsp granulated dashi.
1 stalk green onion, chopped
Toasted nori for decoration
Method:
Boil water and cook udon according to instructions. Drain when done. I usually also run the noodles through cold water to wash off any starch and to stop it from cooking further.
Remove mentaiko from casing and mix with mayonnaise, dashi, melted butter and cream.
Heat up some oil in a pan, once the oil is hot, add the udon to the pan. Stir fry the noodles for a bit. Yes "a bit" is a unit of time. Basically just enough to heat up the noodles again xD.
Add kimchi and mix well with udon.
Add mentaiko, turn off heat and mix until everything is....mixed.
Add chopped green onion and toasted nori before serving.
Watch as significant other shovels your portion into his mouth.
Whine.
Judgy face cat is judging you.
Bonus NOTD - Wet n Wild in Back Alley Deals (Thank you D!)
Cheesecake has always been the bane of my baking existence. No bake ones wouldn't set properly, and baked ones would burn on the outside and runny on the inside with a cracked top. So I don't know how it was exactly that I found myself making cheesecakes on a Sunday night. Oh yes, it was because I had temporarily become single as Mr. Nunu was out playing Settlers. How can something so complicated possibly be fun?!
I used this recipe for Chantal's New York style cheesecake with some changes. The resulting cheesecake tastes EXACTLY like the ones you buy from the bakery! It is rich and creamy and fluffy and dense and velvety all at the same time. I managed to make two 10" pies plus 5 teeny weeny cupcakes from the batter. You can halve the ingredients for 1 pie or pour everything into a 10" spring-form tin.
You will need:
3 cups graham cracker crumbs
3/4 cup butter
1 tsp ground cinnamon
3 (250g) packages cream cheese
1 cup and 2 tablespoons white sugar
1/2 cup and 1 tablespoon milk
3 eggs
3/4 cup sour cream
2-1/4 teaspoons vanilla extract
3 tablespoons all-purpose flour
For the sauce:
2 cups fresh or frozen mixed berries
1/4 cup white sugar
1 tbsp jam (I would recommend some sort of berry jam)
1/2 cup water
squeeze lemon juice
Preheat oven to 325F for a pie and 350F for a cake (163 degrees C).
In a medium bowl, mix graham cracker crumbs with melted butter and ground cinnamon. Press onto bottom of pie dish. I used a disposable pie dish to avoid washing up xD
In a large bowl, mix cream cheese, sugar and milk until smooth. Mix in the eggs one at a time, mixing just enough to incorporate. Mix in sour cream, vanilla and flour until smooth. Pour filling into prepared crust.
The recipe actually says that you should cream the cheese and sugar together until smooth before you add the milk. I've found this to be rather impossibru as the cream cheese tends to stay rather solid even after 30mins out of a fridge. Adding the milk helps everything churn better so you don't end up over mixing. Cutting your cream cheese into smaller chunks help too.
Fill a baking tray with water and put this tray on the rack directly below the rack your cheesecake is going to bake on. This bit of ingenuity is apparently called a "water bath". The water in the tray turns into water vapour inside the hot oven and cools down the oven somewhat. This somehow prevents your cheesecake from cracking.
Bake pie at full temperature for 35-40 minutes, turn temperature down to 300 and bake for another 15-20 minutes. Cheesecake is done when the edges have puffed and turned colour a bit but the middle is still slightly wobbly. At that point, switch off the oven but allow the cheesecake to sit in the oven for 20minutes or so with the oven door cracked open an inch or so. The idea is cool the cheesecake off gradually. You should refrigerate the cheesecake over night before serving.
To make the sauce, boil the water in a small sauce pan, add the sugar, jam, and lemon juice. Once this has reduced to a syrup like consistency, add the mixed berries.
?
Profit. Serve cheesecake with mixed berry sauce and fresh fruit.
I've been on a baking roll ever since Mr. Nunu bought me a KitchenAid mixer for Christmas. I didn't want the ingredients leftover from making cheesecake to go to waste so I found this simple green tea cake recipe which uses everything up nicely.
I basically followed this recipe for Green Tea Layer Cake with some slight alterations. This recipe will make about 15 normal sized cupcakes.
For the cupcakes you will need:
1 cup all-purpose flour
1 cup cake flour *1
1 teaspoon baking soda
1 teaspoon salt
4 teaspoons matcha powder **2
1 1/4 cups white sugar
1 cup vegetable oil
3 eggs
1 cup plain yogurt ***3
1 1/2 teaspoons vanilla extract
For the icing you will need:
1 cup whipping cream
1 1/2 tsp vanilla extract
Powdered sugar to taste
Green tea powder to taste
* I didn't have cake flour at home so I substituted. For every cup of cake flour a recipe calls for, you can use a mixture of all purpose flour plus corn starch. Simply replace 2 tablespoons of every 1 cup of all purpose flour with 2 tablespoons of cornstarch and sift the mixture together a few times. Easiest way to do this is to put 2 tablespoons of cornstarch into the measuring cup and fill up the rest of the cup with all purpose flour.
** I used 5 teaspoons of matcha powder plus the contents of 2 green tea teabags that I ground to a fine powder in a food processor. This gave the cupcakes a strong green tea flavour which I like but if you don't then stick with what your taste buds tell you.
*** I didn't have any yoghurt in my fridge so I used the remainder of my "sour cream" which I had originally made from whipping cream for my cheesecake. You can use yoghurt, whipping cream, half & half, buttermilk etc etc.
Directions:
Preheat oven to 350 degrees F (175 degrees C). Line a muffin or cupcake tray with cupcake liners. Sift together the all-purpose flour, cake flour*, baking soda, salt, and green tea powder**; set aside.
In a large bowl, beat together sugar, oil, and eggs until smooth. Stir in 1 1/2 teaspoons vanilla. Beat in the flour mixture alternately with the yogurt***, mixing just until incorporated. Pour batter into prepared tins.
Bake in the preheated oven for 20-25 minutes, or until a toothpick inserted into the center of the cake comes out clean. Pop the cupcakes out and cool on a wire rack.
For the icing, simply pour the whipping cream into a cold bowl and beat with an electric whisk until soft peaks form, then add vanilla extract, green tea powder and powdered sugar and whisk until hard peaks form. DO NOT OVER WHISK OR YOU WILL END UP WITH BUTTER or so I was told in Home Economics class.
Wait until the cupcakes are completely cool before icing.
?
Profit. Eat
Yes I'm aware that my cupcakes didn't come out looking too green. I suppose you can add a drop of green food colouring to your batter for aesthetics.
These taste just like the green tea cakes that you find in Asian bakeries. The green tea gives it a lovely aroma and a characteristic bitterness which is balanced out by the sweet icing.
In a pan over medium heat, mix the sugar, soy sauce, sake, garlic and ginger together. Once it starts to reduce and thicken, remove from heat and cool fully.
Wash and dry the halibut, once the sauce is cool, allow the fish to sit skin side up in the sauce for 20-30mins.
Oil a grill pan over medium heat, once grill is hot, place the fish skin side down, cover with lid.
While the fish is grilling, keep basting the fish with the remaining sauce.
Grill the fish without flipping over for around 13mins depending on thickness.
Once fish flakes easily, switch off heat, add remaining sauce into pan and chopped spring onion.
Nom.
And Maru video guaranteed to put a smile on your face =^..^=
Helloo! your friendly neighbourhood Nunu here with a shameless self plug.
About 2 months back I entered my Honey Garlic Fried Ribs recipe to the Maple Leaf Prime Pork blogger recipe contest. In case you missed it, it looked like this:
If you want the recipe, it can be found in this post.
There were a total of 20 bloggers who entered this contest, most of the famous foodie bloggers, so I really didn't expect to come any where.
AMAZINGLY, and due to the sheer support of all you beautiful people, I managed to garner 600 odd votes which puts me currently in 4th/5th place!!! Thank you all for your immense support!!
I am currently around 170 ish votes from 3rd place and I really can really use your support to put me in 3rd place!
The top 3 recipes are put through to a round of judging by the Maple Leaf chefs who will decide on a final winner. The winner gets $500 worth of groceries and the first runner up gets $200 worth of groceries. If I come out with any sort of winnings, I will be donating it to a food bank in downtown Vancouver.
PLEASE continue your support by voting for me. To vote for me, please click here
It requires that you "Like" the Maple Leaf Prime Pork facebook page and you can vote daily!
I also find it kind of amusing that Maple Leaf's Chef Placko made a video on my recipe xD The way that he holds that huge plate with 2 pieces of rib on it is just pure LoL
Once again, thank you guys so much for your support so far! Please keep supporting!
Much Love
Nunu.
Curious about what dinner at my house is like? read on. Excuse the disgusting colour of my veggies, they were from the day before xD
Beer and garlic mussels
You will need:
500g Frozen or fresh cleaned mussels
3/4 cup beer
Dash of Tobasco sauce or however much you want depending on your tolerance.
2 cloves of garlic - minced
1/2 tsp salt
Pinch of dried chilli flakes depending on tolerance
Small bunch of fresh coriander - finely chopped
Le Methode:
Mix together the beer, Tobasco, garlic, salt, and chilli flakes.
Heat up a sauce pan, throw in your mussels.
Pour the beer mixture over the mussels.
Cover pan with lid, cook for 4-5 minutes or until mussels begin to open and turn opaque.
Sprinkle with coriander and serve with the juices.
Cream corn soup
You will need:
1 can cream style corn
equal parts water to cream corn
Approx 70g chicken breast - diced into small cubes
1 small piece of fresh ginger approx 1" in size - julienned
1 1/2 tbsp soy sauce
1 tsp salt
1 1/2 tsp sugar
1 tsp vegetable oil
1 tsp corn starch
1 egg - lightly beaten
1 stalk green onion - finely minced
OPTIONAL: mushrooms or other veggies
Le Methode:
Mix together soy sauce, salt, sugar, sugar, oil, ginger, and corn starch to make a marinade. Add your diced chicken to this marinade. Allow to sit for 15-20mins.
Empty cream corn into pot, add equal parts water.
Once the cream corn begins to boil, add the chicken including its marinade.
Once soup returns to boil, turn heat down to low, allow to simmer for 5 minutes or until chicken is cooked.
Take pot off heat, add beaten egg and green onion. Stir.
Black Bean Steamed Cod
You will need:
1lb Black Cod steak
1tbsp preserved black bean
2 cloves garlic - minced
1" piece of fresh ginger - minced
1 tbsp soy sauce
1 tsp vegetable oil
1 tsp corn starch
Le Methode:
Clean and pat dry cod. Rub with corn starch and set aside in a heat resistant dish.
Mix together preserved black bean, minced garlic, minced ginger, and oil.
In a wok with heat on high, sauté the black bean mixture until garlic becomes fragrant.
Coat cod thoroughly with the sautéed black bean mixture
Steam the cod for approx 10mins or until cod is fully cooked.
Remove cod from steamer, pour out excess juices, pour soy sauce over cod.
Finally another recipe! This one is quite special, this is potentially the recipe I'll be submitting to the Mapleleaf Prime Pork Blogger cook off contest.
Yours truly was one of the 20 bloggers on the West Coast selected to take part in this contest. Wow, I really feel quite grateful to be selected into such a niche group!
The winner gets $500 worth of groceries courtesy of Mapleleaf Canada. I know this will probably be a long shot considering the talent of the other contestants, but the reason I entered is because I'm hoping to donate the groceries to one of the non-government subsidised food banks/soup kitchens here in British Columbia. I find it quite appalling that in a 1st world country like Canada, there are still so many people who are starving on the streets. EDIT: I have decided to enter this recipe into the contest! Please show your support by voting for me here. You can vote once every 24hrs. Nunu's Kitchen needs your support!! Thank you!
Honey Garlic Fried Ribs You will need:
1 package Mapleleaf Prime Pork Back Ribs - cut into individual ribs.
Canola oil for frying.
For the marinade:
3 tbsp cooking Sake;
1 knob fresh ginger approx 2 finger lengths in size - juiced and pulp discarded;
2 1/2 tbsp light soy sauce;
1 tbsp brown sugar;
1/2 tsp salt;
For the breading:
1/2 cup bread crumbs;
1/4 cup corn starch;
For the sauce:
3 cloves garlic - minced
1 tsp dried chilli flakes
3 tbsp honey
1/2 cup tomato sauce
Le Methode:
soak cut ribs in cold water for approx 30mins to drain away any traces of blood;
Prepare marinade by mixing together the Sake, soy sauce, ginger juice, salt and sugar. It should taste sweet, yet salty at the same time, the fragrance of the Sake and the warm heat of ginger should be noticeable.
Marinate the ribs in the marinade for at least 6 hours and preferably overnight.
Once ribs are ready, remove them from the marinade juice and bread them in a mixture of breadcrumbs and corn flour. If you want an even fluffier and crunchier exterior, first dip the ribs in an egg wash before breading.
Heat oil on medium heat. Test by dropping a bit of the breading in. It should not be so hot that the breading will immediately turn black!!! It should roll around and turn a nice golden colour. I don't have a deep fryer so I used the smaller pot I had xD hey it works!
Fry the breaded ribs. I did mine in batches of 3 and it took approximately 5-6 minutes to turn golden. Once the ribs turn a medium golden colour and no more blood comes out of the bone, remove the rib and allow it to drain on some kitchen towel.
Turn heat on high and allow oil to heat up.
Fry the ribs a second time, about 30 seconds each should do it. They will now turn a darker golden colour and will be really crispy on the outside. Remove and allow to cool and drain on some kitchen towel.
Make your sauce. Mix together the tomato sauce, honey and chilli flakes. Turn heat on low medium, in a pan, sauté the garlic in some oil. When garlic get fragrant, add the tomato sauce mixture. Stir well until sauce thickens. Er....yeah I didn't take a photo of the sauce but if you look in the right hand corner of the photo below, that's how the tomato sauce, honey, chilli flakes mixture should look like xD
Add fried ribs to sauce. Mix well. Excuse the shoddy photo, my usual photographer was off playing Starcraft -__-
Once ribs are evenly coated, remove from pan and serve immediately.
Please tell me what you guys think!!! should this be the recipe I enter into the contest? or is it too...blah? Any tips?
Dry fried beef rice noodles (乾炒牛河), also known as Beef Chow Fun, is one of my all time favourite noodle dishes. It makes a great breakfast or lunch with some congee xD
While the ingredients are simple, this dish is almost impossible to replicate at home as a lot of the favour comes from "鑊氣" (wok breath or "wok hay"). Think of it as an unique flavour that is imparted on stir fried food by the wok itself. Since this "wok flavour" only comes out when a metal wok is heated up over a large gas or wood fire, this dish will definitely taste less authentic when you make it at home. However, the outside version tends to be really heavy on oil and MSG, so I do like to make my own.
You will need:
Approx 150g-200g thinly sliced tip sirloin;
1 packet dried thick rice noodles - soaked in luke warm water for 5 or 10 minutes;
1/2 white onion - chopped thinly;
100g bean sprouts - washed and with the root tip removed;
3 or 4 stalks of green onion - chopped into half finger lengths;
2 or 3 slices of fresh ginger - thinly chopped;
Light soy;
Dark soy;
Splash of Maggie seasoning;
Vegetable oil;
Corn starch;
Salt;
Sugar;
La Methode:
Make marinade for the beef by mixing together: 1 tbsp light soy; 1 tbsp dark soy; a dash of Maggie seasoning sauce; 1/2 tsp vegetable oil; 1 tsp sugar; 1/2 tsp salt; 1 tsp corn starch. Add a little water if needed. Marinate the beef in the marinade for at least 15mins.
Put heat on high, and lay beef slices down flat. Flip once. Cook the beef until it is 60% done. Try not to stir the beef otherwise it'll curl up.
Once beef is 60% done, remove from wok.
Saute onions and bean sprouts together in a bit of vegetable oil. Saute until onion browns and becomes fragrant.
I skipped photos here because I had to move fast >__> but when your onions start browning, add your drained rice noodles. Stir the noodles around the wok quickly using chopsticks, your spatula will be useless here.
Add 1 tbsp light soy, and 1 tsp sugar to the noodles. Stir.
Add the beef and any remaining juices to the noodles. Stir.
Switch off heat. Taste. If noodles taste too bland, add some dark soy.
Apparently a lot of people are turned off by cooking due to long cooking times. Let me assure you, yummy food can be made in a very short period of time. Case in point - this pasta only took 20mins to prepare and cook.
Seafood Pasta:
You will need:
Pasta - boil in salted water and drain. Mix in a little olive oil to stop them from sticking to each other.
Assorted frozen/fresh seafood - You can use shrimp, mussels, calamari, clams, scallops, anything really! I used frozen merely because they are cheap and convenient. Defrost under running water and drain as much as possible.
1 tin diced tomatoes - drain and reserve juices.
Assorted vegetables - I used peppers and frozen veggie medley. Once again, just use whatever you have in your fridge! Peas, carrots, celery, courgettes, onions etc.
2 bay leaves.
1/3 tsp fennel seeds
1 tsp crushed garlic
Salt and pepper to taste.
Small bunch of Coriander - chopped coarsely.
La Methode:
Olive oil and garlic in pan - high heat until garlic is fragrant.
Add vegetables to pan - saute for 1 or 2 minutes.
Add drained diced tomatoes, fennel seeds and bay leaves to pan - medium heat, simmer for a few minutes.
Add assorted seafood. Add prawns LAST! don't be stupid like me -__-. Cover pan with lid and let simmer until seafood is cooked. Add salt and pepper if needed.
Add drained pasta to pan, add chopped coriander, toss and eat.